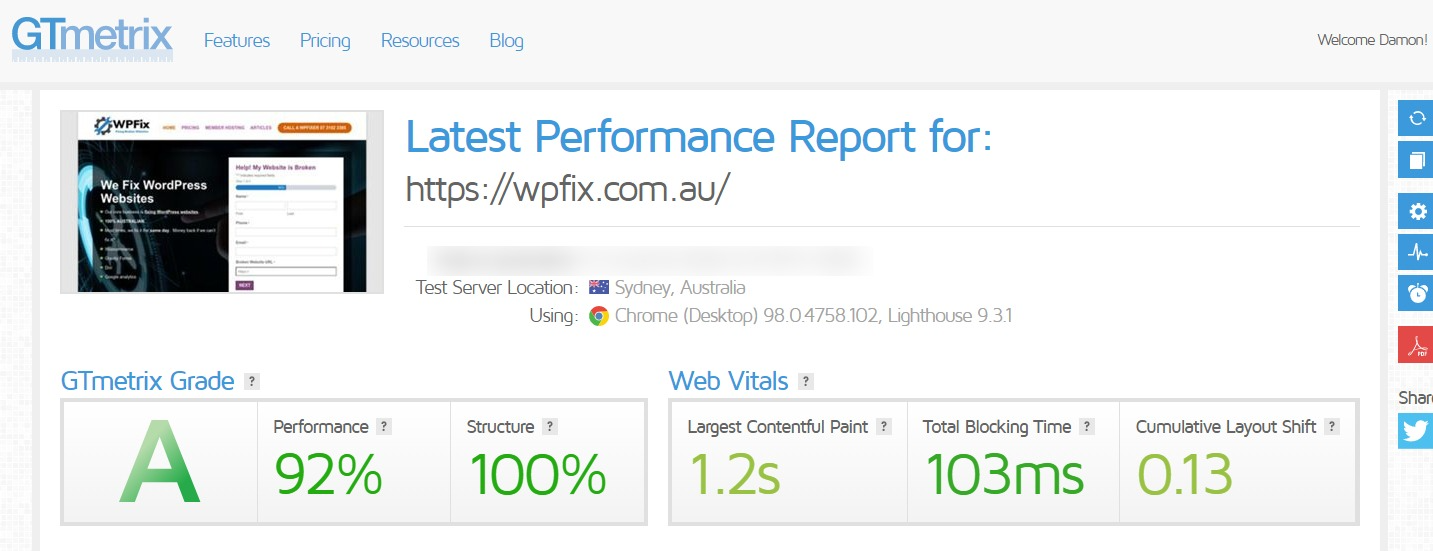
Everyone wants an A for their site right? Who wouldn’t. I’ll show you how.
It would be great if wordpress automagically reconfigured itself for optimum performance. But it doesn’t. Not yet anyway. There are so many variables involved in website development nowadays that it only takes one or two wonky variables to drastically reduce SEO performance. Get a bunch of them wrong and a site will tank quite quickly.
Getting the technical optimizations needed for better ranking websites these days requires some expertise and some know how. Below is the method I use to boost my site metrics.
I use Divi theme builder for every site I build. The optimizations explained below are using the Divi theme…but realistically, they can be used for any theme because all the optimizations relate to all wordpress sites.
I also use cloudflare for every site I build. I started using cloudflare years ago because it was an easy way to manage DNS records for every site I built in a single account. It also offered caching and security because they would block traffic that was nefarious. Over the years cloudflare have added more services which make it a very handy tool. Just about all their services are offered on their free plan.
Some of the techniques explained here utilise cloudflare. There are other services that can do the same thing but I have used cloudflare because its the one I know.
My techniques for fast page loads are quite simple and nothing new. It involves asking oneself one simple question.
How do I make a website APPEAR quicker to search engines using fewer resources?
There are 3 key words here: APPEAR, Search Engines and Resources. Essentially we want to demonstrate to search engine bots that our our site is easy to crawl QUICKLY and that our site is equipped for a superior user experience ie stuff doesn’t move around (known as cumulative layout shifts CLS)
Basically we put our website on a diet. If one changes the way we think about websites in terms of consumption, intake and output… then we will build better sites!
Our website diet will involve:
- Better Management of 3rd Party Scripts
- Streamline Google Tag Manager
- Removing unused code and page caching
- Next gen image conversion
Better Managing 3rd Party Scripts
Most sites have a chat widget or chatbot to enhance user engagement and ask questions. And often these 3rd arty services provide a piece of code to load into the head of your site. Easy … but these 3rd party scripts come at a cost. They are render blocking and take a little longer to load because they have to travel from a 3rd party site and your site has to wait until that bit of code has finished loading. You don’t have any control over how quickly the code loads. Even if you add add ASYNC or DEFER attributes to the code… the site still has to wait.
External Javascript Files
Most themes allow you to add a code to the head of your site. Paste it in, save and it works.
Instead of loading the scripts into the head of your site, save the script into a javascript file in your child theme file. eg /wp-content/theme/CHILD_THEME_NAME/chatbotcode.js (don’t forget you don’t need script tags in external js files)
Then use a javascript settimeout() function in the head to delay the chatbotcode.js by 5-6 seconds. Search engines will then consider the code loaded (as if it wasn’t even there) without any need to wait. This will significantly reduce the render blocking time and improve your load times. The net effect is the code takes just as long to load… but google bot will move to the next page and not penalize the page for loading too slowly. Add this to the head of every page. Don’t forget you need script tags for this code.
setTimeout(load_js, 6000); // Delay 6 seconds in loading function
function load_js()
{
    var head_ID = document.getElementsByTagName("head")[0]; // Get the head tag
    var script_element = document.createElement('script'); // Create script element
    script_element.type = 'text/javascript'; // Set the script type to JavaScript
    script_element.src='/wp-content/themes/CHILD_THEME_NAME/chatbotcode.js';  // External JS file
    head_ID.appendChild(script_element);
}
Once this is loading correctly, your lighthouse and GTMetrix scores ought to improve.
Streamlining Google Tag Manager
We can’t delay Google Tag Manager because it often contains Google analytics. If we delay it too long, it may not even load before users click to another page in which case we don’t get accurate analytics. So we can’t delay it but we don’t want to wait for it either.
Loading Tag Manager from a sub domain means that the page and the subdomain load in parallel ie simultaneously at the same time. One doesn’t wait for the other. CDN’s work the same way. Essentially what we are doing is caching google tag manager and loading it super fast via our mini CDN using cloudflare.
Even on the free plan, cloudflare allows you to use workers. Put simply, workers are javascript files that do something. In our case, we are going to save the GTM javascript code as a worker at cloudflare and map it to a sub domain that we create. When our site pages load, GTM will load from our sub domain and will no longer be render blocking.
There are 4 steps in setting up a cloudflare worker to host our GTM code.
- Create a worker for the GTM code
- Create the sub domain for the GTM code
- Map the sub domain to the worker
- Update the GTM code of your website.
Step 1 – Create a new worker at Cloudflare
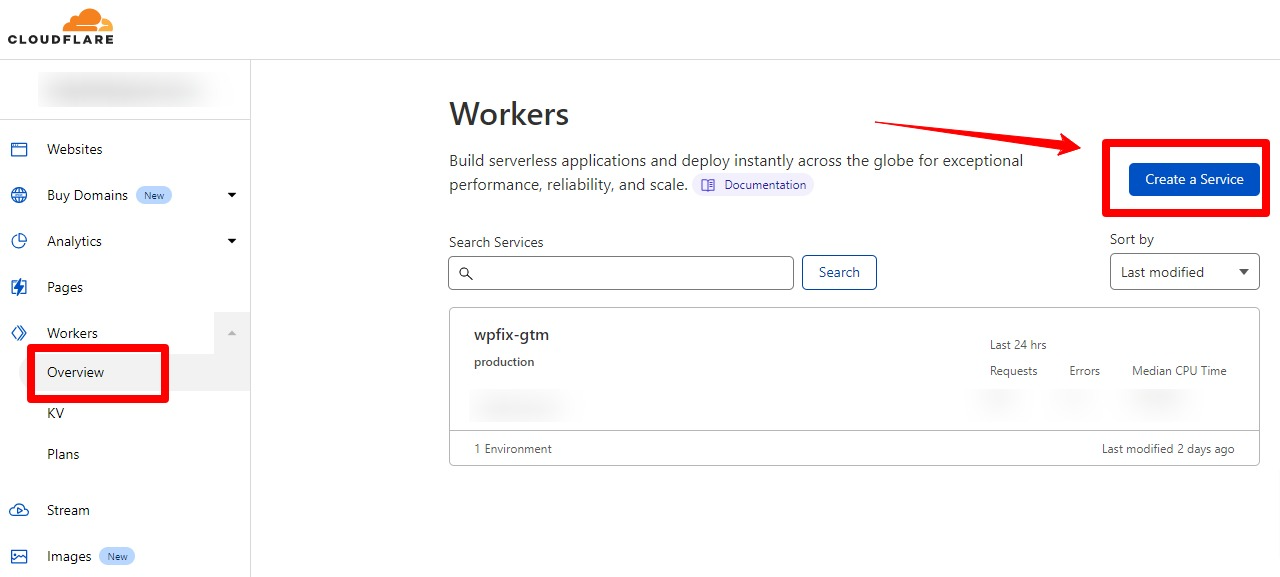
Give your worker/service a name eg gtm or google-tag-manager
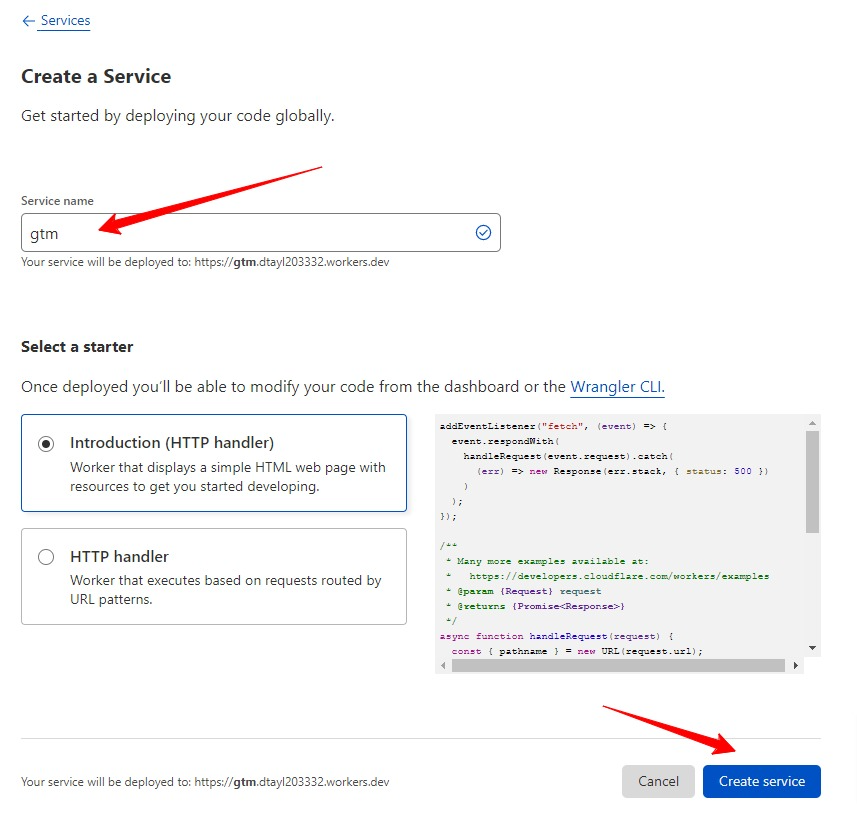
Once created, click edit.
REPLACE the code with the following code. Be sure to swap out your GTM ID on the first line. Save.
// Change to your own GTM container
const GTM_URL = `https://www.googletagmanager.com/gtm.js?id=ADD YOUR GTM ID HERE`;
const CACHE_EXPIRY = 30; // cache timeout in seconds

// Listen to any incoming requests and apply our function
addEventListener('fetch', function(event) {
  try {
    event.respondWith(handleRequest(event))
  } catch(e) {
    console.error(e)
  }
})

async function handleRequest(event) {
  const request = event.request

  // Only GET requests work with this proxy.
  if (request.method !== 'GET') return MethodNotAllowed(request)

  // https://developers.cloudflare.com/workers/examples/cache-api
  const cacheURL = new URL(request.url);

  const cacheKey = new Request(cacheURL.toString(), request);
  const cache = caches.default

  let response = await cache.match(cacheKey);

  if (!response) {
    // If not in cache, get it from origin
    response = await fetch(GTM_URL);

    // Must use Response constructor to inherit all of response's fields
    response = new Response(response.body, response)

    response.headers.append("Cache-Control", `s-maxage=${CACHE_EXPIRY}`)

    // Store the fetched response as cacheKey
    // Use waitUntil so you can return the response without blocking on
    // writing to cache
    event.waitUntil(cache.put(cacheKey, response.clone()))
  }

  return response
}

// Use the following when the request is not a valid GET request
function MethodNotAllowed(request) {
  return new Response(`Method ${request.method} not allowed.`, {
    status: 405,
    headers: {
      'Allow': 'GET'
    }
  })
}
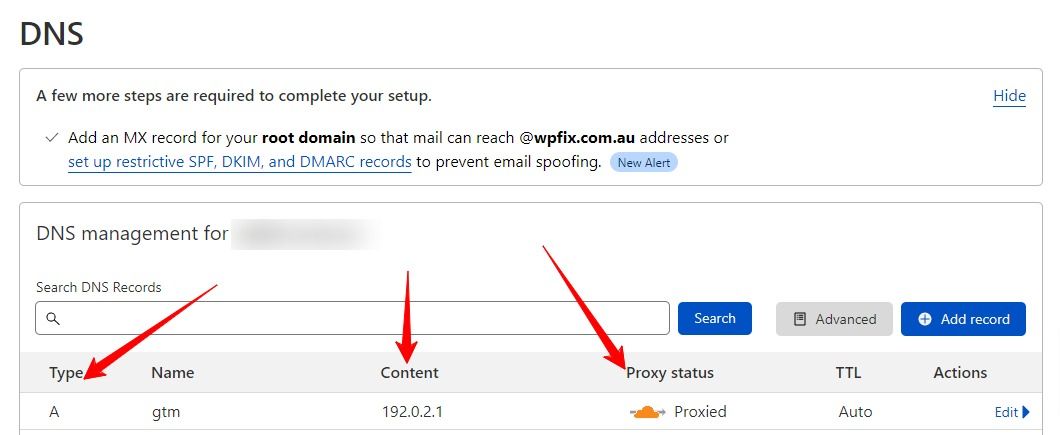
Step 2 – Setting up a sub domain at cloudflare for GTM
Next we need to set up a subdomain at cloudflare using an A record. Add 192.0.2.1 as the IP address which points it straight back at cloudflare. You’ll see why in a moment.
Step 3 – Mapping the worker to the Subdomain
From the cloudflare menu on the left, choose workers and Click Add route
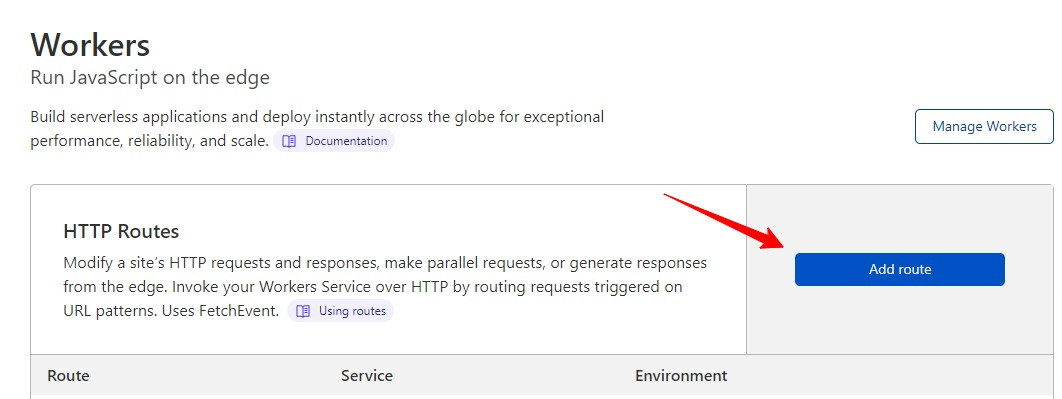
Now we want to route the worker so that it fires on the web pages that we choose. In the case of GTM, we want it to fire on all pages. So we use URL pattern matching using wild cards to match all our site URLs
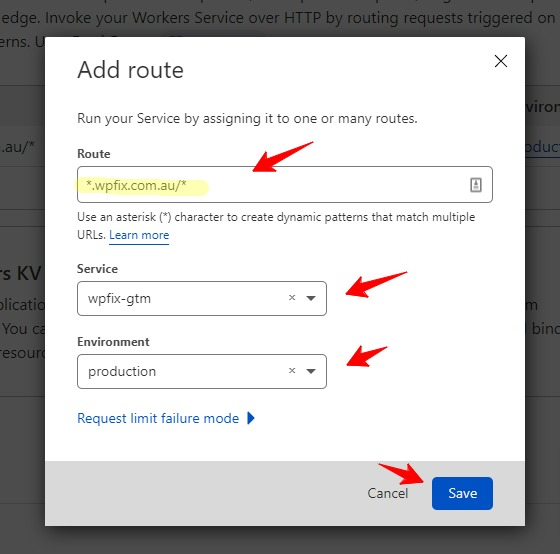
Save.
Step 4 – Update the GTM code on our website so that it points to our sub domain
Go back to your website and find the GTM code. Look for the highlighted piece of code.
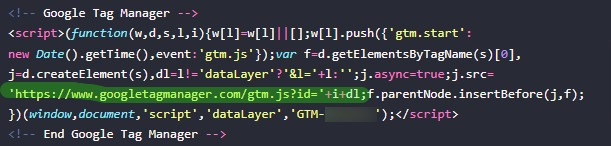
Swap out the highlighted piece of code with your new subdomain like this.
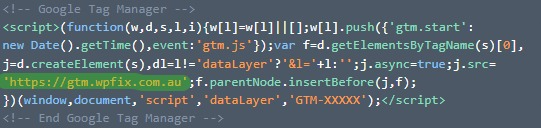
Save.
Test and make sure that your analytics are working.
Security Bonus
Using cloudflare gives us and extra security bonus on 2 levels. Firstly it doesn’t expose the GTM container ID and secondly, it is being delivered via a custom sub domain which reduces the risks of cross domain hijacking. Its also very fast.
You ought to see improved scores in GTMetrix and Lighthouse.
Remove Unused Code
Caching Plugins
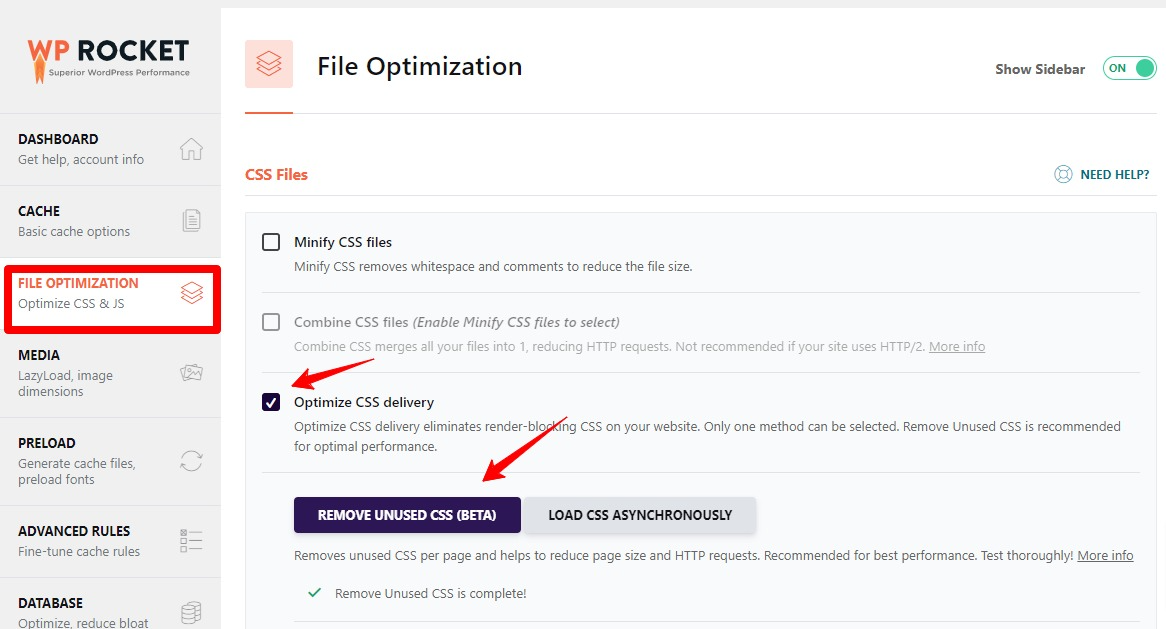
I use WP-Rocket plugin for caching. There are bunch of caching plugins that are all very good. But WP-Rocket does something that very few of them do which significantly improved performance scores.
It uses a tool to scan your site and removes unused css from your site files. WP-Rocket does a lot of other cools stuff too, but the unused css tool significantly improved site performance scores and for me is worth the price on its own. Its takes a few minutes for the scan to do its job… and in some cases it might run for quite a while. Be patient. Best to open and new tab and work on something else.
Other plugins such as WP Asset Cleanup will disable plugin css and javascript on page that don’t use a particular plugin. For instance, the WP Asset Cleanup will load in forms css and js for those pages that have a form and then remove it for those pages that don’t. There is no point in loading in css and js onto pages that don’t need it. Its a clever way of making your site leaner and more efficient.
Image Compression and File Types
Next gen image file types such as webp are very small file sizes yet still display very clear images. There are a few good images compression plugins and services, but I one I am using at the moment is webp Converter. It will scan your images and convert them to webp if the webp images is smaller. It will display webp images if the browser supports them (not all web browsers support webp images just yet) and will fall back to the original image ie jpg or png etc… if webp is not supported.
Depending on how many images and your server speed will govern how long the conversion takes. It could take a while on larger sites.
Converter for Media – Convert WebP and AVIF & Optimize Images | Ease image optimization
Conclusion
By being smarter with external scripts, offloading google tag manager to a subdomain, removing unused code and using next gen image files types will go a long way to improving your site performance scores. Google bots are more likely to index everything on your site rather than some of it because pages load too slowly.


0 Comments